Abstract
Using a camera connected to a Raspberry Pi, the objective is to build a bird feeder system that can perform object recognition on birds in real-time, stream the video feed to a server, and send the user alerts containing the resulting videos of birds. The project is divided into two parts: the embedded system and the web client. The embedded system consists of a Raspberry Pi 3 and a camera that work in tandem to capture, process, and output video to a server. This process uses computer vision to identify birds in the frame as they appear in real-time. The second half, the web client, is responsible for hosting the video feed and sending alerts to the user. These alerts also contain the species of bird identified in the frame. The front-facing web server allows the user to view the live video feed from anywhere in the world – not just within proximity of the Raspberry Pi.
The results of the project include statistics on the performance of the neural network that is used for object recognition, such as the accuracy and speed of the model, false positive rate, and system reliability. Qualitative results regarding what succeeded and what failed are also provided, along with pictures of birds and the species that were identified by the system.
The motivation and desired application of the project stems from the difficulty of inexpensively studying wildlife. Wild animals are easily scared by human interaction and do not stay in one location for long periods, warranting expensive long-range cameras or lots of wasted recordings. The solution, a camera complete with computer vision, wireless alerts, and a smart recording system, allows the user to know exactly when and what species of birds were seen, without the need to monitor the bird feeder manually. Furthermore, the camera records only when a bird is recognized in the frame, eliminating hours of blank recordings and the need to manually review them. Other similar smart cameras with fewer features cost upwards of $200, while the one outlined in this project is configured for $60. This high-performance low-cost computer vision system can be applied to solve many other similar monitoring problems, such as in home and commercial security, traffic, weather, farming, and medicine.
Executive Summary
After a year-long design project, the Raspberry Pi (RP) and its camera can successfully identify birds using You Only Look Once (YOLO) Object Recognition. Using OpenCV to preprocess the data coming in from the camera, the RP extracts the most recent frame and performs object recognition on the frame. If a bird is detected, the RP begins recording a video until the bird is no longer detected. Upon the completion of the video, an email is immediately sent to the user with the video optionally attached. Finally, using Google Lens, the species of bird is identified and appended to the data and metadata of the frame. A live feed of the bird feeder can be accessed from anywhere in the world. Once the system is running, the end-to-end process of taking in video and outputting a recording works without any human interaction. The system works as intended has no known bugs and can run forever as long as it is connected to power and the internet.
The biggest tradeoff, which became a recurring theme throughout the project, was the balance between speed, accuracy, and cost. The main goal of this project was to find a reliable real-time computer vision solution for less than $100 since comparable products on the market sell for $200+. The Raspberry Pi 3, perfect for its $35 price tag, has limited memory and computation power, requiring a significant focus on code optimization.
Lots of efforts were made to find clever ways to increase the speed of object recognition on the RP without compromising usability. The most significant improvements came from not detecting objects on every frame, but rather every few frames. This method uses the assumption that if an object is present in frame n, then it will likely be present in frame n+1. Furthermore, it was found that motion detection is faster than object recognition. To take advantage of this fact, the RP looks for motion every few frames until something enters the frame and motion is detected. Then, object recognition takes place until the object leaves the frame and the RP starts looking for motion again.
Using a smaller and therefore less memory-intensive YOLO neural network, combined with the many computation optimization strategies outlined above, object recognition could be performed in real-time as intended with an accuracy of above 90%.
Introduction
In our increasingly technology-driven society, web cameras have gained popularity to monitor surrounding events. However, the feed of most video cameras is broadcast only over Local Area Network (LAN), meaning the camera cannot be viewed from anywhere in the world. Furthermore, these cameras are always recording which requires lots of storage and lots of manual effort to locate key moments of interest. This project employs a Raspberry Pi and a camera connected to a bird feeder to demonstrate the effectiveness of real-time object recognition in solving these problems. The RP can intelligently switch between a “record” state and an “observe” state to ensure only significant activity is recorded, saving storage and time spent sifting through video. The resulting video is then broadcast over Wide Area Network (WAN), immediately sending it to the user anywhere in the world. This project uses birds as a case study, but this single solution applies to many similar problems, such as studying wildlife, home or commercial security, traffic monitoring, farming, and medicine.
Although current web or smart cameras offer some combination of WAN access, adaptive recording, and computer vision, these solutions cost upwards of $200 (some charge monthly subscriptions on top of that), while this project offers a complete package for a materials cost of $60.
Design
Design Overview
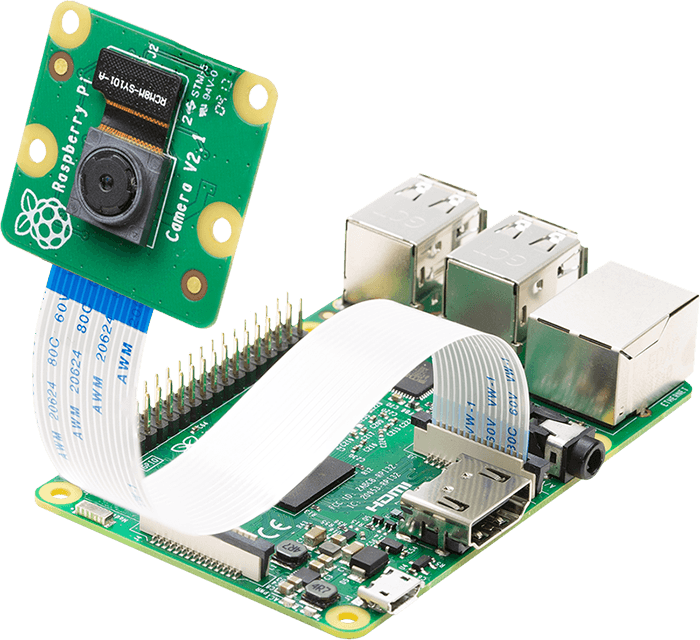
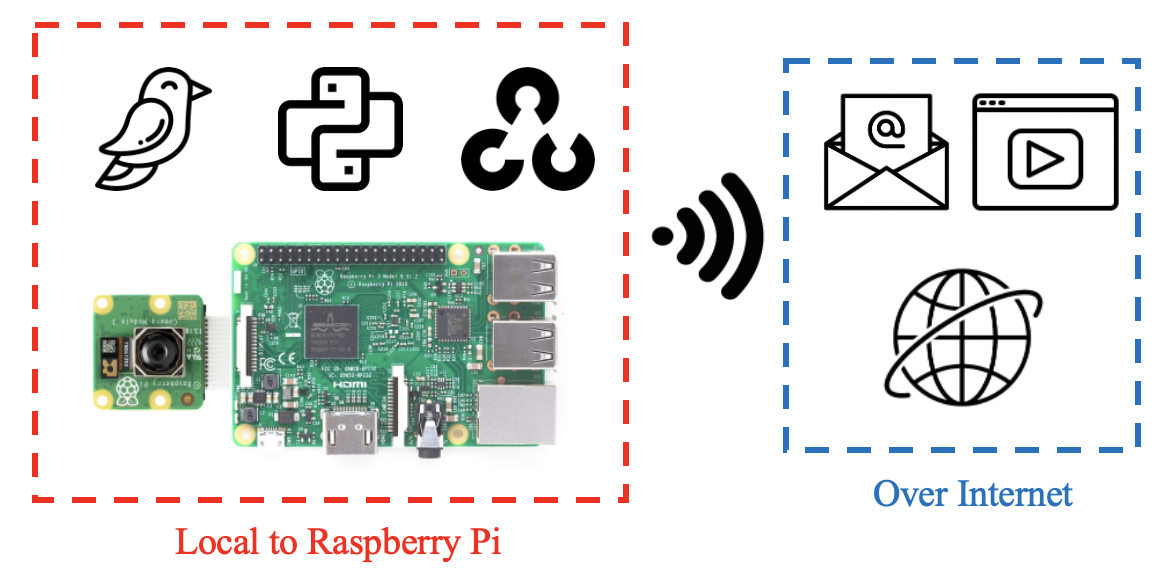
The project design is based on a Raspberry Pi 3. The motivation behind a Raspberry Pi over a microcontroller is the ability to use OpenCV, which requires an operating system. Connected to the RP is a camera sensor. The RP must be connected to power over a micro USB at all times. The RP powers the camera as seen in Figure 1 using the included ribbon cable. Most code is written in Python and runs on the Raspberry Pi in perpetuity using systemd, but there is also some JavaScript and HTML. The multithreaded code simultaneously performs computer vision on an incoming stream of frames and uploads processed frames to a web server. The stationary camera is pointed at a window that houses a bird feeder, which is the application being demonstrated for this project.
 [1]
[1]
Hardware Design
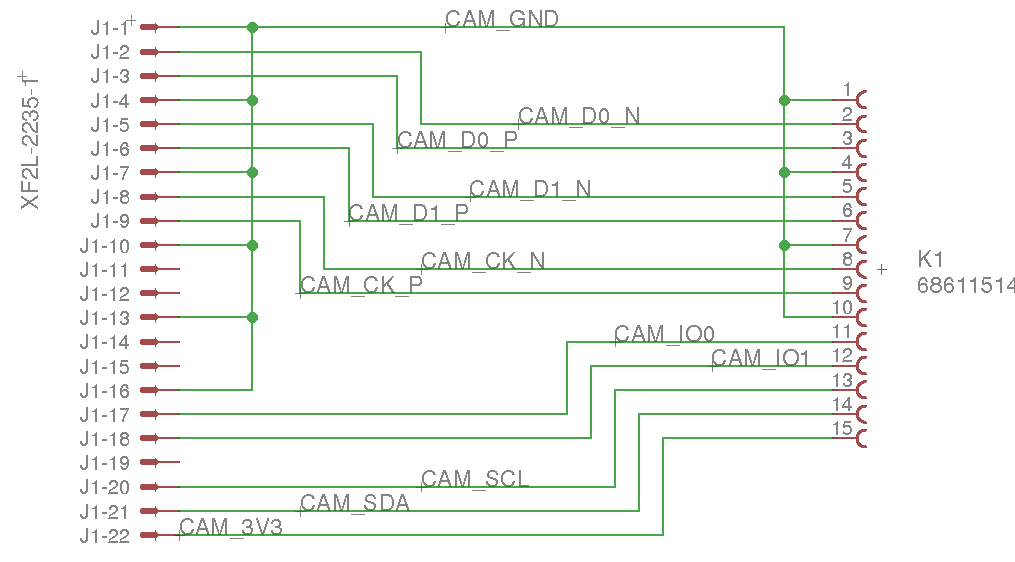
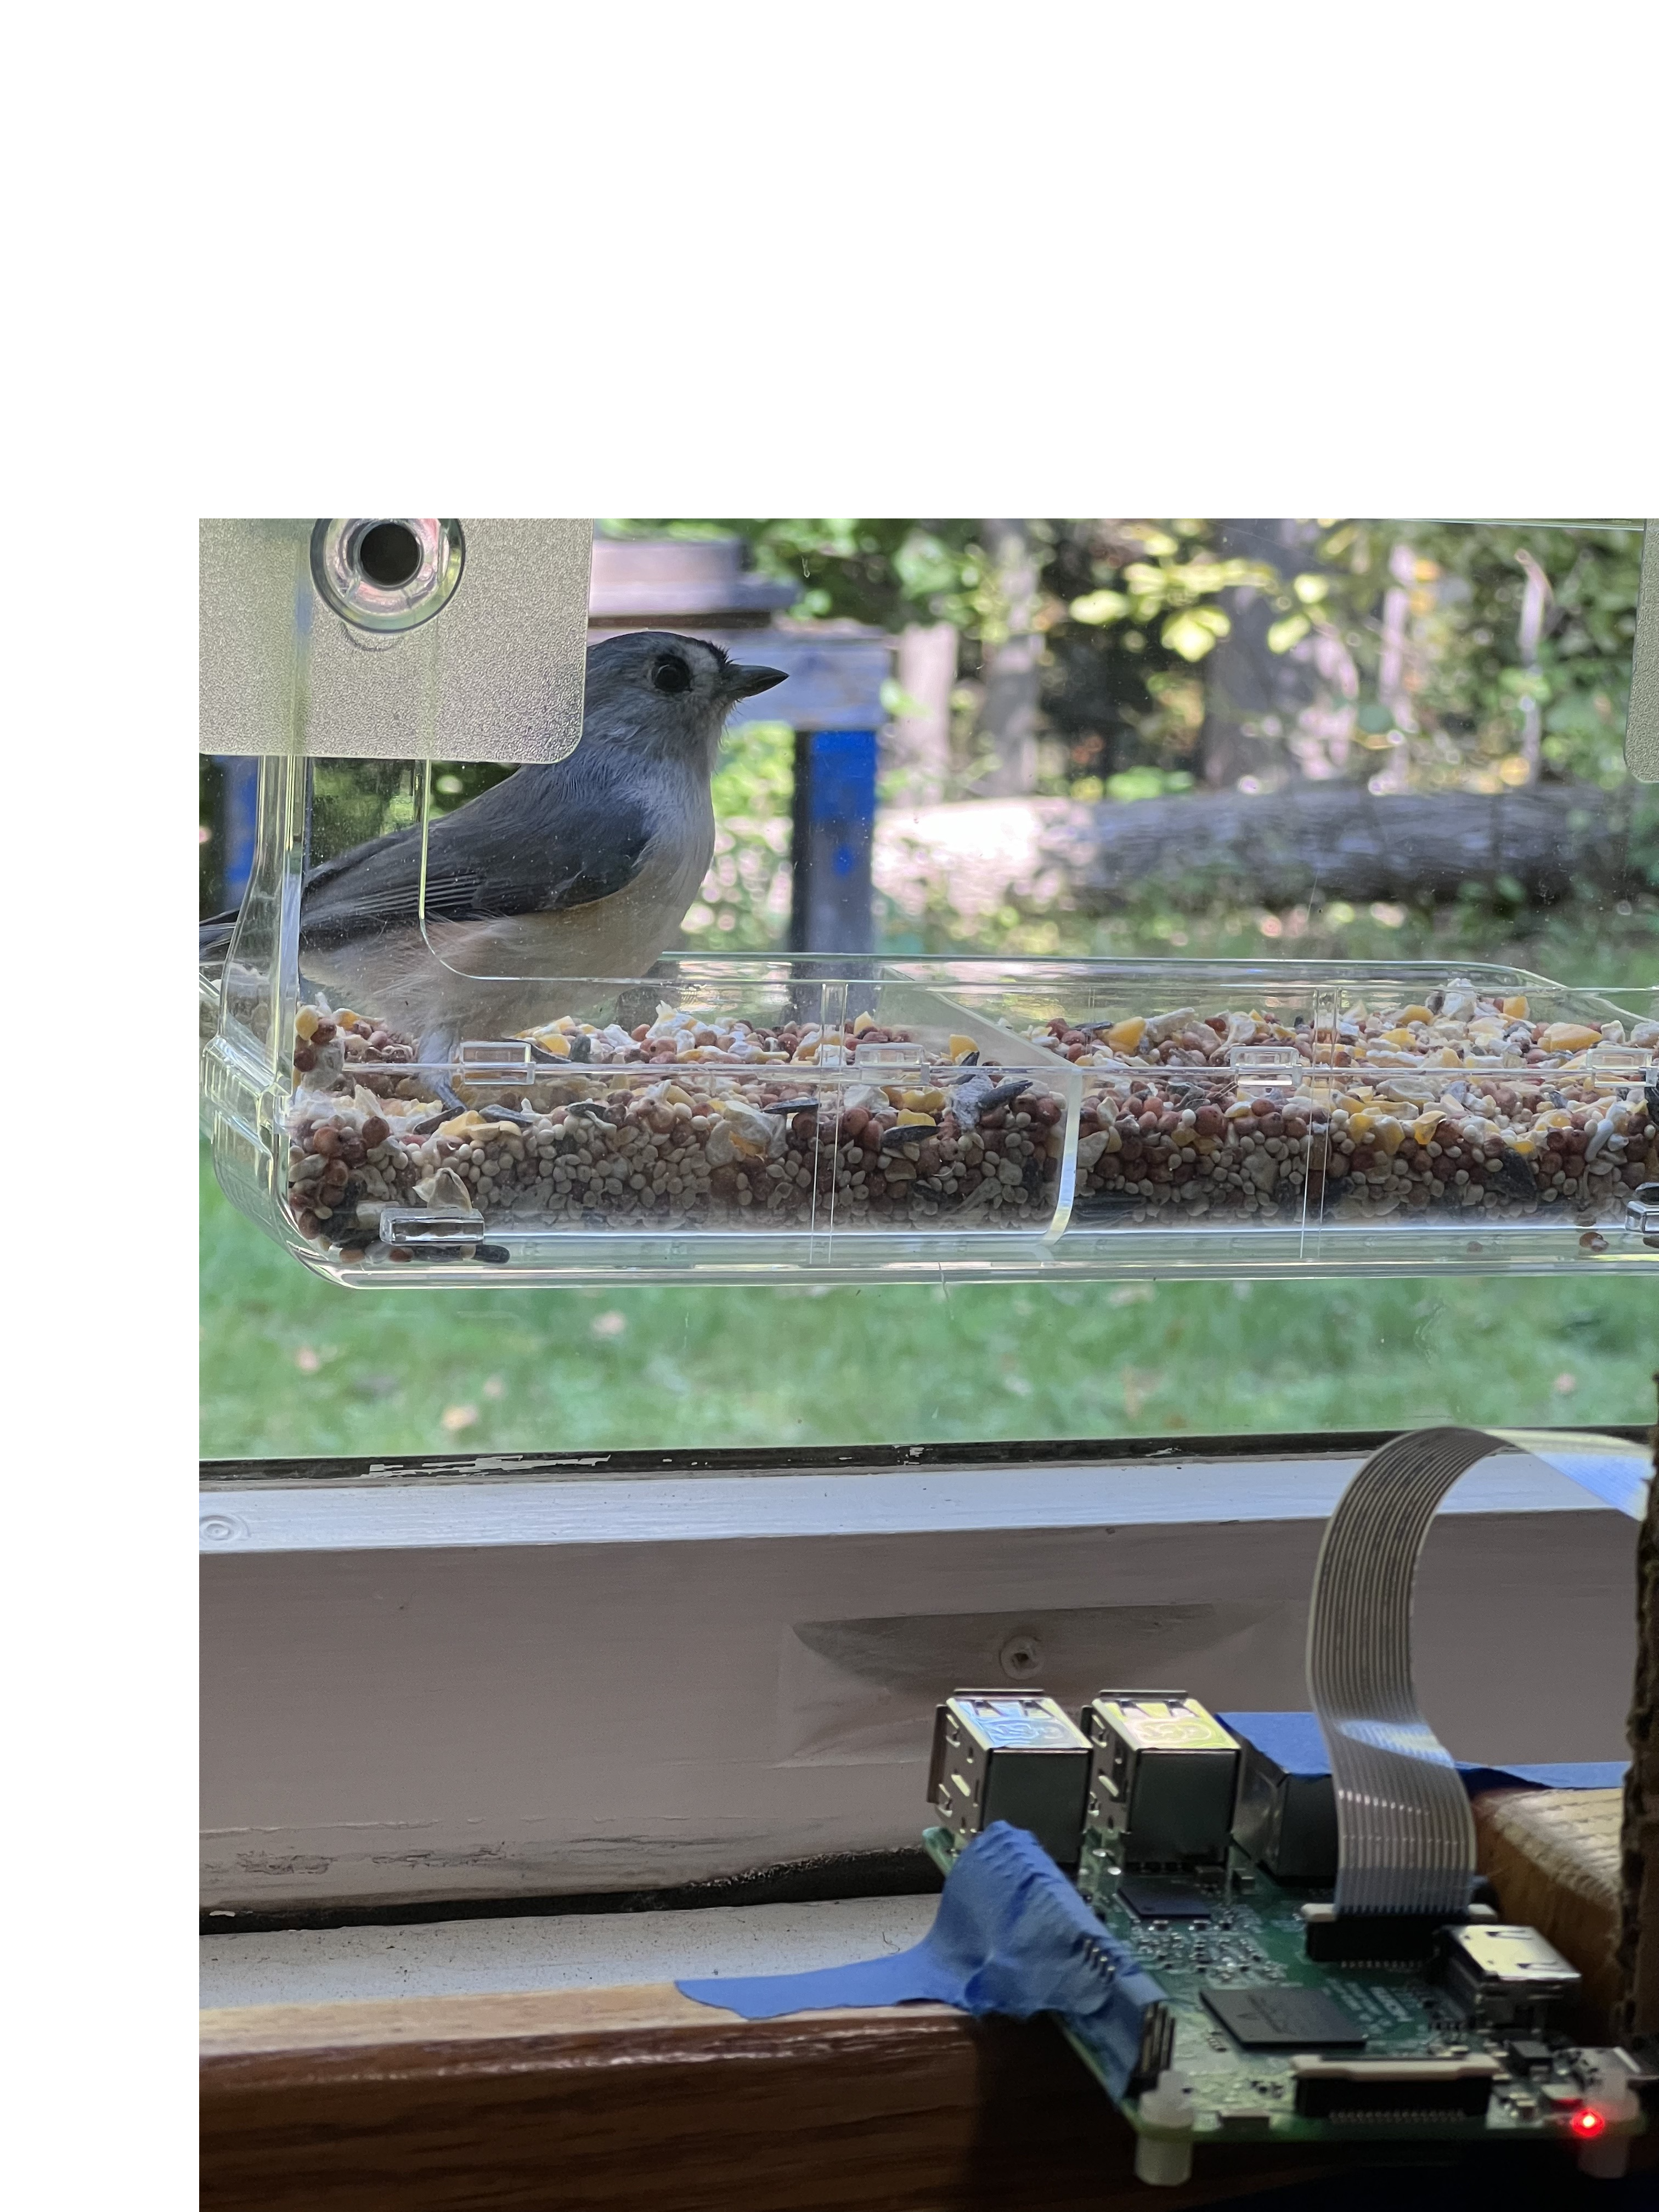
The hardware consists of four off-the-shelf components wired together and is designed to be as simple as possible: a computer, a camera, an SD card, and a power cord. The Raspberry Pi 3 is fitted with built-in Bluetooth and Wi-Fi capabilities and is powered via a 12 W micro USB power supply. The device has 4 cores and 1 GB of RAM. A camera is connected to the Raspberry Pi via the included plug-and-play ribbon cable, whose pinouts are seen in Figure 2. Finally, an SD card is inserted into the RP which contains the Operating System for the Raspberry Pi. The entire system is kept stationary to keep the video feed stable using a custom-made prototyped housing. The camera is pointed at a window that has a bird feeder affixed to it, as seen in Figure 3.
 [2]
[2]
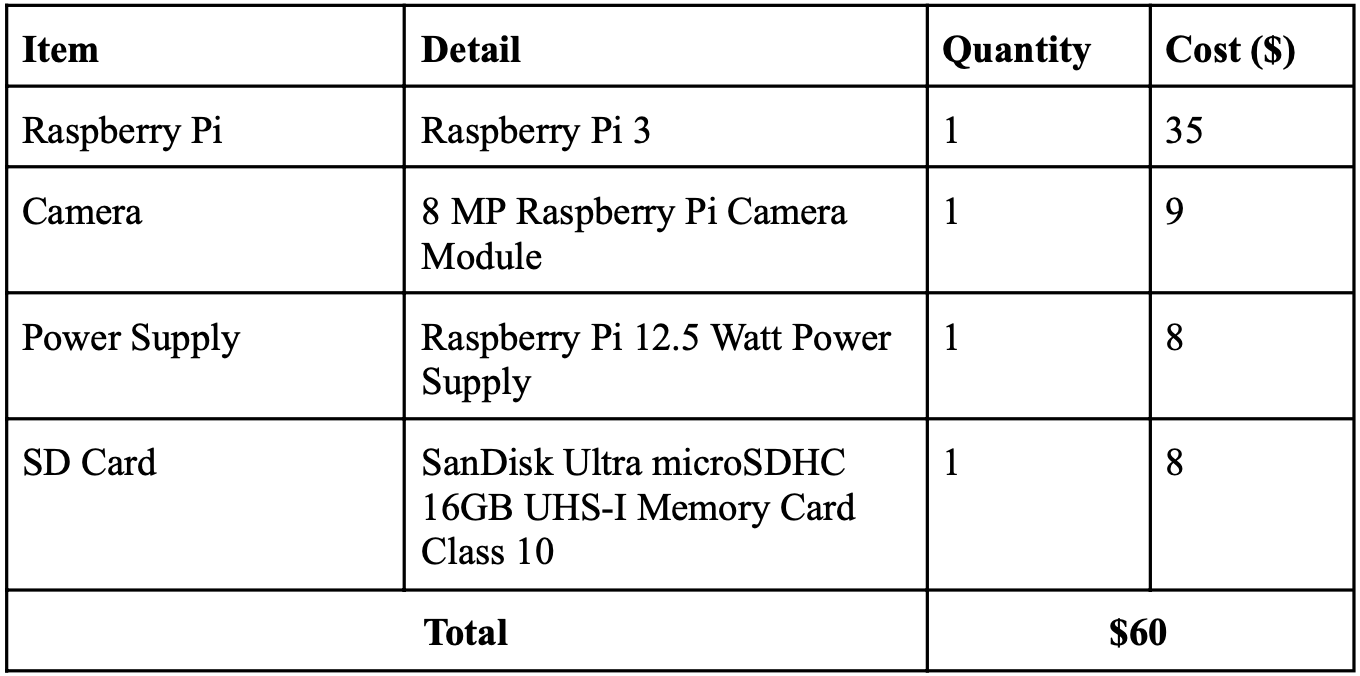
Bill of Materials
Software Description
Filetree
├── img
│   └── lens.png
├── processing
│   ├── classification
│   │   └── yolo.py
│ ├── email
│   │   └── send_email.py
│ ├── lens
│   │   ├── main.js
│   │   └── package.json
│ ├── motion
│   │   └── motion_detection.py
│   └── recording
│       └── record_video_stream.py
├── reboot.sh
├── server_classification.py
├── start.sh
├── templates
│   ├── index.html
├── videos
└── yolo
    ├── coco.names
    ├── yolov3-tiny.cfg
    └── yolov3-tiny.weights
Software Overview
The Raspberry Pi and its camera perform motion detection and object recognition on birds locally in real-time using OpenCV for Python. Each frame is broadcast over the internet to a self-hosted web server. When a bird has been recognized, a video gets recorded and emailed to the user who can view the web feed and receive videos from anywhere in the world. The end-to-end system is depicted in Figure 4.
External Libraries
A web framework called Flask is used to create and update a local webserver and imutils VideoStream is used to extract data from the camera and convert it to a Python-readable format. OpenCV is used to process the images from the video stream before they are sent to the Flask webserver, recorded, or emailed to the user. NumPy is used to aid with miscellaneous mathematical calculations. All other Python imports are either included in the Python standard library (queue, thread, time, argparse) or are custom classes and functions contained in /processing (MotionDetection, YoloObjectDetection, RecordClip). In the custom JavaScript API, a library called Puppeteer is leveraged to visit webpages in code without a graphical user interface.
Motion Detection
MotionDetection is a class found in /processing/motion/motion_detection.py. Detecting motion requires taking the difference between the current frame and the previous
frame after they have been set to greyscale. Areas of the frame that contain a difference high in magnitude are areas that have changed a lot and therefore likely contain motion. To make the detection more robust to noise, the average of the past 10 frames is calculated before subtracting the current frame. Then, any pixels with a magnitude greater than 25 are set to white (255) and all other pixels are set to black (0). Finally, using OpenCV, the x-y coordinates of the smallest box that fits all contours are returned. A box with coordinates (x1, x2, y1, y2) = (-∞, ∞, -∞, ∞) is equivalent to no motion being detected.
YoloObjectDetection
YoloObjectDetection is a class found in /processing/classification/yolo.py that is used as the main object detector in the project. Upon initialization of the class, a pre-trained
neural network is loaded so object recognition can take place. To load a network into OpenCV, both a configuration file and a weights file are required. The configuration contains detailed information on the network including the size, depth, and type of inputs and outputs the network can expect. The weights file contains the actual parameters of the neural network which is used to perform a forward pass and make predictions given an input. Finally, the predictions given as integers are mapped to a string using a text file that contains a list of the labels in the same order as they were when the neural network was trained. For this project, the specific configuration, weights, and labels files are located in /yolo and are called yolov3-tiny.cfg and yolov3-tiny.weights respectively. This “tiny” (34 MB) version of YOLO v3, while less accurate than its full-sized counterpart (237 MB), is used due to memory constraints on the Raspberry Pi. More details are in the Results section under Accuracy.
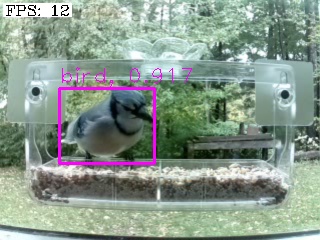
After the network is initialized and labels have been loaded into memory from storage, there are two other functions in the class: detect_objects and draw_labels. Detecting objects is as simple as running a forward pass on the neural network with the input image. For every potential object in the image, the network outputs a list of the probability of each label. Then, by taking the argmax of this list, the most likely label for that object is returned. If this probability is more than the given threshold, the corners of the object, its label, and the model’s confidence are appended to a list. After all objects in the image are looped over, the list containing all corners, labels, and confidences is returned. To draw labels, the image gets passed into draw_labels along with the corners, labels, and confidences returned from detect_objects. Then, using OpenCV, boxes are drawn around the detected object with its label and confidence at the top left of the box. The new image containing the bounding boxes and labels is returned, as seen in Figure 5. Since this project is only focused on recognizing birds, the image will only activate RecordClip and send_email.py as described in the following two sections if the label returned from YOLO object recognition is “bird” above the given confidence threshold.
RecordClip
RecordClip is a class found in /processing/recording/record_video_stream.py used to record and save videos from the camera. Initializing the class allows the user to choose the size of the circular buffer and the frames per second of the video. While in the not recording state, each call to update will add a frame to the circular buffer such that the most recent few frames are always saved. Then, when a bird is recognized by detect_objects in the YOLO object detection class, it is time to start_recording. Each frame in the buffer is emptied into the newly initialized OpenCV video_writer one frame at a time. After the buffer is emptied, a new thread is created and the system enters the recording state. Once in the recording state, the frames go directly into the video writer by calling video_writer.write on the current frame. When the bird is no longer detected, stop_recording is called, and the last frame gets written to the video writer before the function terminates. The class allows the user to configure any video encoding format, file name and path, and file extension they desire, providing flexibility for any use case.
send_email.py
send_email.py contains one function, send_email, that automatically sends an email to the specified list of email addresses with a subject line, message, and optional
attachment. It utilizes Python’s built-in library for creating Multipurpose Internet Mail Extensions (MIME) to leverage both HTML and file attachments in the email. By importing MIMEMultipart from Python, the email is constructed by first attaching the file, if present, to the MIME multipart, then attaching the body (a string formatted as a chunk of HTML). Finally, using the Simple Mail Transfer Protocol (SMTP) library from Python, the script logs into the sender’s email account using the given application-specific password and sends the email. At this time, the SMTP server to send from is hard-coded to smtp.gmail.com and therefore only works if the sender is a Gmail or Google Workspace account.
index.html
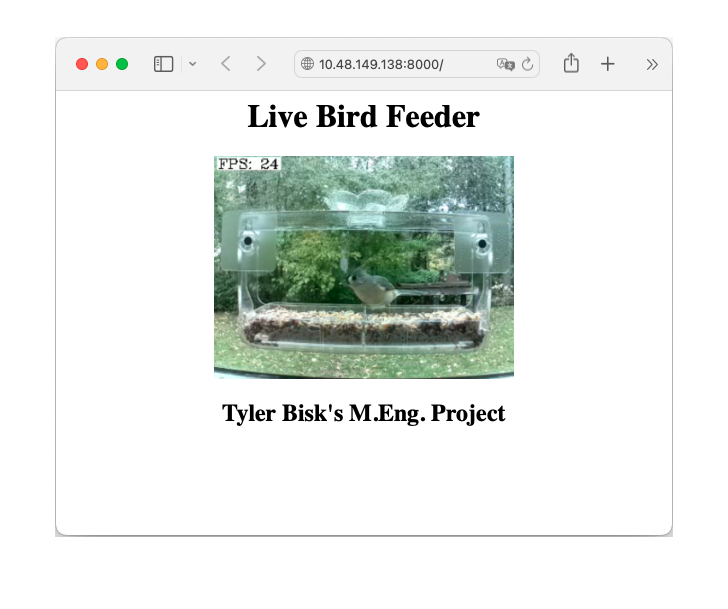
This file forms the webpage that can be viewed in a browser when running the main code. The library that is used to generate the web server allows for full web applications, so full customizability is possible. The HTML file displays text with the title and author of the project along with an image. The intended use of the web page is for the image displayed to be the current frame from the Raspberry Pi Camera after it has been processed by the computer vision thread. A snapshot of the web server being used as intended is shown in Figure 6.
processing/lens/
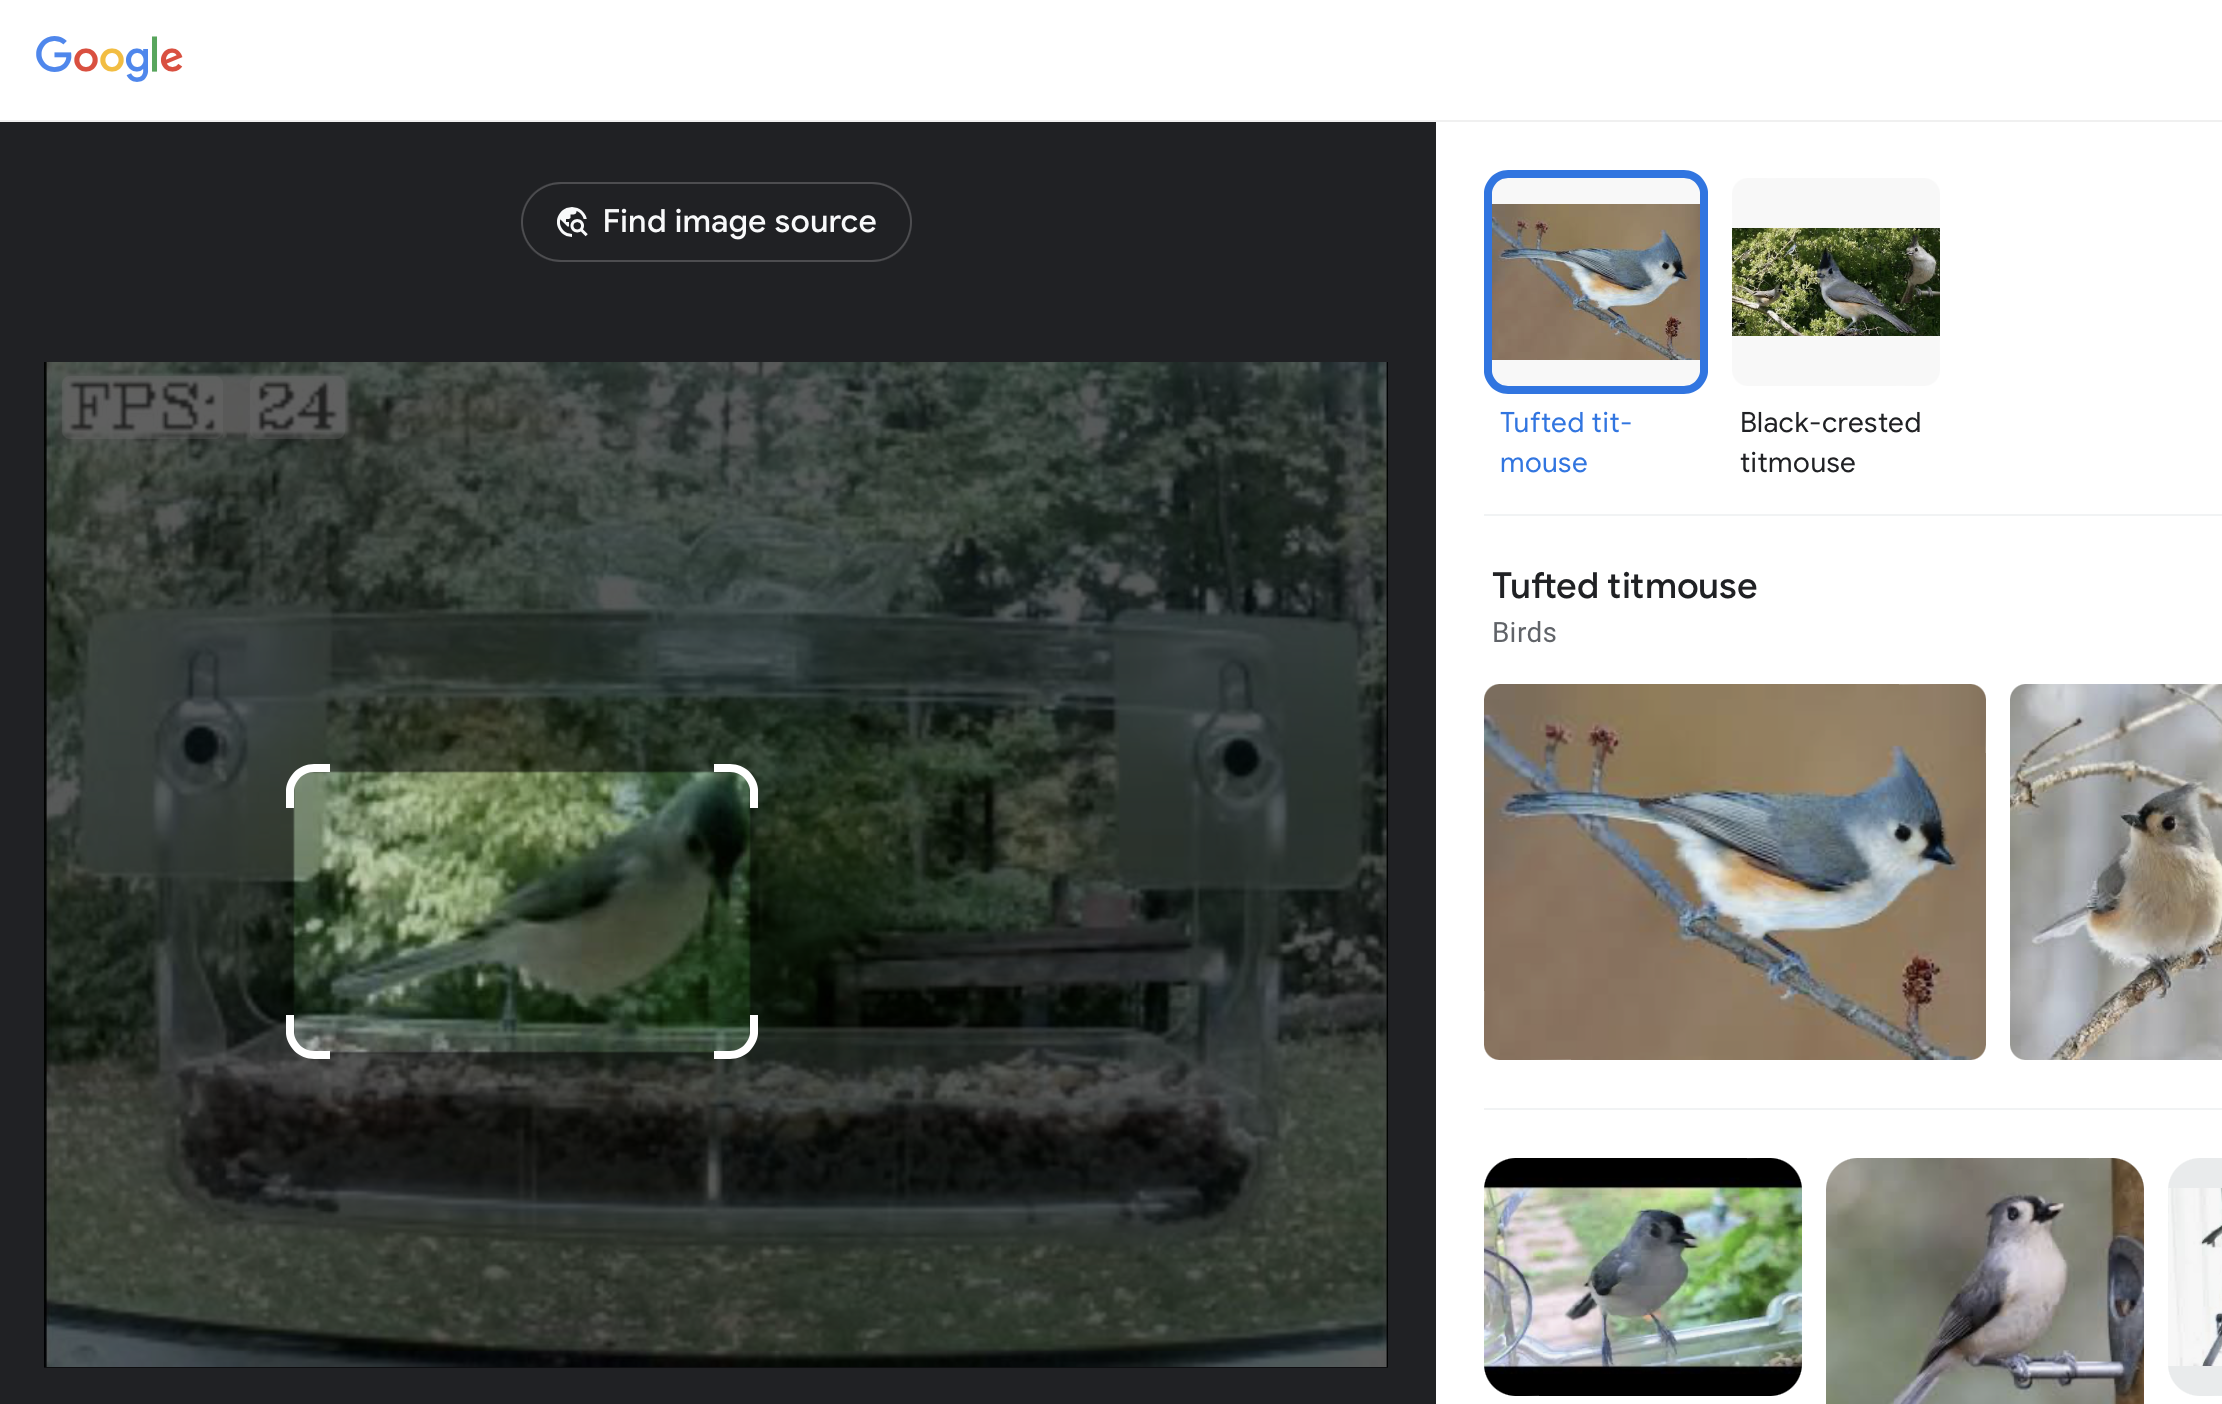
Lens is a subfolder of processing that contains the custom JavaScript API for returning the species of bird contained in the input image. This API utilizes Google’s free service called Lens, which allows the user to upload an image and return its detailed label, as shown in Figure 7. While the Raspberry Pi contains only enough processing power to return a label such as “bird,” Google’s expensive server farm allows it to be as granular as returning the exact species of bird in the image. The API fetches the image from /img/lens.png and uses the puppeteer library to visit Google Lens on that image without the use of a graphical user interface. After loading the webpage, the API grabs the appropriate label from the HTML code and returns it.
To build and run the API, the command node main.js is run in the directory that contains both the main file and its configuration, package.json.
reboot.sh
This file is a simple bash script that gets the current date and time and appends a message “Rebooted at $current_date” to the end of log.txt, useful for reliability analysis. The script is automatically run on boot a one-line addition to Linux’s crontab.
start.sh
This simple bash script is similar to reboot.sh, but in addition to appending “Started camera and server at $current_date” to the log file, it also sleeps for 10 seconds to wait for the RP to connect to the internet. Then, it writes the results of ifconfig to a file called ip.txt. After the script is run, ip.txt then contains the local and global IP addresses of the server so the user knows what address the server can be accessed at. The global IP address allows the user to view the web server from anywhere in the world. Finally, start.sh calls python server_classification.py, the file that contains the main code for the system and activates the computer vision thread and the web server thread.
systemd
systemd is a built-in feature of Linux that manages various software services. For this project, systemd is configured to call start.sh on boot and call it again every time it terminates.
Therefore, if for any reason the script crashes, it will restart automatically and resume with very little interruption. Each time the script restarts, another line is added to log.txt, providing the user insight into when and how often the system crashes. Since the system also calls start.sh on boot, reboot.sh is also called to distinguish a power or hardware-induced failure from a software-induced failure.
server_classification.py
This file contains the function __main__ and therefore is the script that runs the entire project. The script begins by creating two threads. One thread performs computer vision on the images from the camera feed and the other thread is responsible for the web server. The global variables shared by both threads are the video stream from the camera, the current frame that is output after computer vision has been performed, and the lock that prevents the output from being written by both threads at once.
Since server_classification.py is multithreaded, it is important to ensure that if one thread crashes, the entire program is terminated since all threads combined are required to
ensure the system works as intended. After the main function spawns the computer vision thread and the server thread, the main function enters a while True loop. On each iteration of the loop, it checks that the current number of threads active is equal to the number of threads that were active at the beginning of the program’s execution. If this number of threads has decreased, the system exits completely, allowing systemd to automatically restart the script after logging the failure.
Computer Vision Thread
In the computer vision thread, both the YOLO network and video stream are initialized according to the optional arguments, and a while True loop is entered.
The first line of the while loop is to get the current time so frames per second (FPS) can be calculated and the time since motion or objects were last checked can be tracked. Next, the current frame is extracted from the video stream and converted to greyscale to make motion detection faster, then blurred slightly to provide invariance to noise. If it has been more than 0.75 seconds since motion was last checked for and motion is not presently being detected, look for motion using MotionDetection. If motion is detected, the image is scaled down to make object recognition faster. Finally, objects are looked for using YoloObjectDetection if it has been more than five seconds since the last object search.
Using the output from YoloObjectDetection, the list of objects detected in the current frame is compared with the list of objects that the user wishes to detect, which for this
project is just a single element “bird”. If a bird is present in the object detection list, a bird is said to be recognized and must be recorded. If there is no video currently recording, a video in /videos/bird_{date}_{time}.mp4 is created and is begun recording using RecordClip. On each subsequent iteration of the while True loop, the new frame is added to the recording. The recording ends when it has been two seconds since the last object the user wishes to detect was seen.
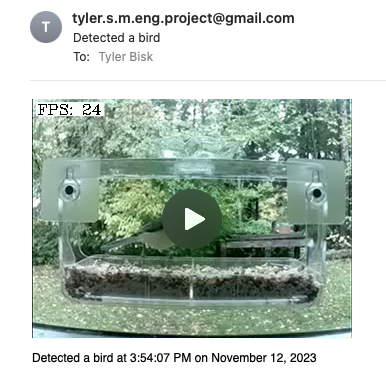
Upon the termination of a recording, if the user desires, an email is sent to the user alerting them that the object has been detected. The subject of the email contains the name of the object that was detected and the body of the email contains the timestamp. Optionally, the recording itself can be attached and sent via email, as seen in Figure 8, and the system returns to the “not recording” state.
Finally, using OpenCV, the FPS is drawn in the corner of the frame. Now, the final frame, seen in Figure 9, is ready to be sent to the web server for the user to view. The lock is acquired and the global variable output is updated to contain the frame. Finally, the entire while loop repeats from the beginning until the script is manually terminated.
Simultaneous to when a bird is first recognized and recording starts, a third thread, lens, is spawned. In this thread, the frame that triggered the recording is saved to /img/lens.png then added, committed, and pushed to GitHub using subprocesses for the Lens API to find it. The thread then activates the Lens API by calling node processing/lens/main.js. When a label containing the species of bird is returned, that label is added to the image before emailing the label and the image to the user, as seen in Figure 10. This process allows the user to use this system not only to recognize birds but also to identify the species of bird with near-perfect accuracy without any ornithological background.

Server Thread
Like the computer vision thread, the server thread is created upon running server_classification.py and never terminates. Before the server is created, the thread sends an email to the user containing the contents of ip.txt so the user knows the address of the server, as it is subject to change on each instantiation of the application. Next, using the flask library, this thread sets up the web server based on the given index.html file. A tunnel is set up automatically so the user can view the video feed from anywhere in the world. To display the current frame on the website, first, the lock must be acquired to prevent reading and writing at the same time and potentially reading a corrupted image. Once the output is obtained, it is converted to a byte array so it can be used in HTML. The byte array is then fed into /video_feed by flask where it can ultimately be read by the HTML file as an image at the relative path specified. Refer to Figure 5 (page 12) to see the video feed running on the web server.
Testing
Since all code is designed to run on an operating system, it is straightforward to test code periodically. The code was written on a laptop and transferred to the Raspberry Pi using Git, but the code runs on a laptop with one simple modification. When setting up the video stream, there is a Boolean option for whether the camera is a USB camera or a Raspberry Pi camera. By changing this configuration option, it is possible to test the main code on the same device where development is taking place. This flexibility allows for rapid prototyping by running code immediately after changes are made. It is important to note that the same memory and computing constraints faced on the Raspberry Pi 3 are not present when testing on a laptop. A modern laptop that costs hundreds of dollars can handle higher frame rates, better video resolution, and larger ML models than the $35 Raspberry Pi. For this reason, off-system testing is restricted to code functionality. Evaluating accuracy and speed can only be done on the Raspberry Pi itself.
Results
Speed
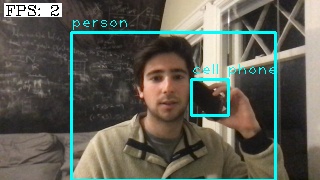
The biggest challenge for the embedded system was the large computation time to run one frame through the neural network to recognize and identify objects. When performing this object recognition on every frame, it ensured the system possessed the most up-to-date information at all times when recording and displaying detected objects in the frame. Although the camera detected objects with very little delay, this method proved to be excruciatingly slow and severely impacted the watchability of the resulting video. With multiple objects in the frame, the performance was consistently less than 2 frames per second, as seen in Figure 11. Furthermore, the next frame could not be processed until the current one was finished processing, creating a backlog of images to process that would get larger the longer the system was running. This delay caused so much time between frames that a bird could fly across the field of view without being captured in a single frame.
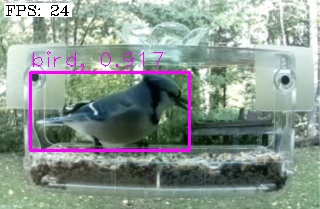
The solution to this problem was to only attempt to recognize objects if motion was recently detected since motion detection is much less computationally expensive than object recognition. This fix kept the queue of frames to process from monotonically increasing. To offer fewer frame rate drops, the maximum frame rate was capped at 24 instead of the original 30. Furthermore, the system was set to not detect objects on every frame, which could keep the video feed and recording at 24 FPS, as seen in Figure 12, even if object recognition took well over 1/24th of a second.
Accuracy
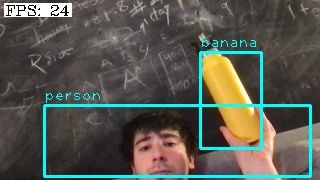
Two different YOLO models were tested and evaluated, namely YOLOv3 and YOLOv3-tiny. The normal-sized YOLO model consistently achieved greater than 99% confidence when labeling canonical views of objects in real-time. Although the model is extremely confident in its predictions, this does not mean the model is always correct. Figure 13 shows a person and a yellow water bottle, but the model mislabeled the water bottle as a banana. This is the only object that was consistently misclassified during testing, likely due to its bright yellow color.
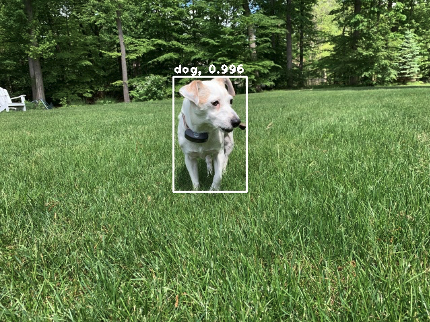
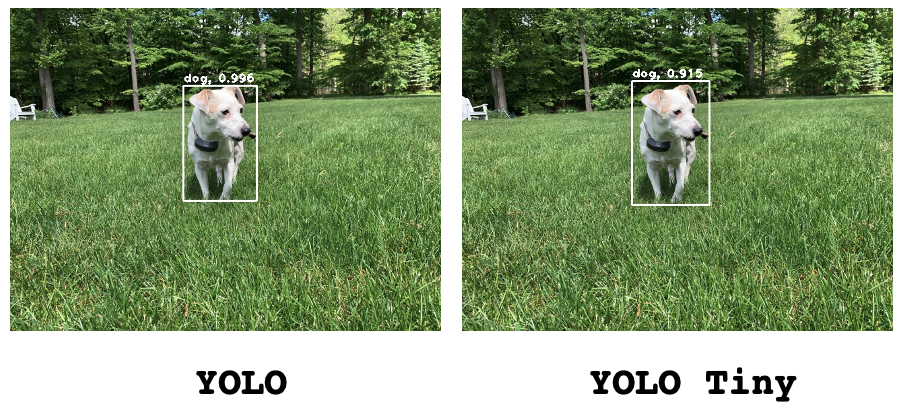
Unfortunately, the model parameters (weights) come in at 237 MB, and are on the upper limit of what the Raspberry Pi 3’s 1 GB of RAM can handle, given other data is being loaded into memory as well. After a few minutes, the kernel shuts down the task for eating up too much memory. One solution was to upgrade to a heftier computer such as the Raspberry Pi 4, which has twice as much RAM, but supply chain issues make this an expensive option. Instead, a lightweight version of the original neural network, called YOLO tiny, was used. This tiny version of the YOLO model is only 34 MB - almost a 90% reduction in size from its bigger brother. However, this model’s confidence is far worse. When detecting a dog in well-lit conditions, the full-size model achieves a 99.6% confidence while the tiny model has a confidence of just 91.5%. Furthermore, the bounding box around the object when using the tiny model is slightly larger, which represents the fact that the model is less sure of exactly where in the image the dog is located. While it is recognized that confidence and accuracy are not directly proportional given both models correctly labeled the image as “dog”, confidence is still a good proxy for accuracy since a less confident model is more prone to mistakes. These results can be seen in Figure 14.
When detecting birds specifically, there were initial instances of false positives at night. However, after tuning the model parameters slightly, these inaccuracies were mitigated. Google Lens offered additional insight into the species of bird detected and was spectacularly accurate whenever it worked. However, about 50% of the time, Google Lens timed out and an empty string was returned. In these instances, the system would still alert the user that a bird was seen but no species was reported.
Reliability
Initially, a $15 Raspberry Pi Zero W was used as a cost-saving method, but out-of-memory errors would cause the entire system to freeze. Even after switching from regular-sized YOLO to YOLO Tiny, these freezing issues occurred approximately once per day and could only be remedied by physically unplugging the Raspberry Pi. The reliability data was acquired using log.txt to keep track of how often the system was hardware rebooted and how often the system’s software restarted. After upgrading to the Raspberry Pi 3 which has double the memory as the RP Zero W, the system was able to run for weeks without interruption.
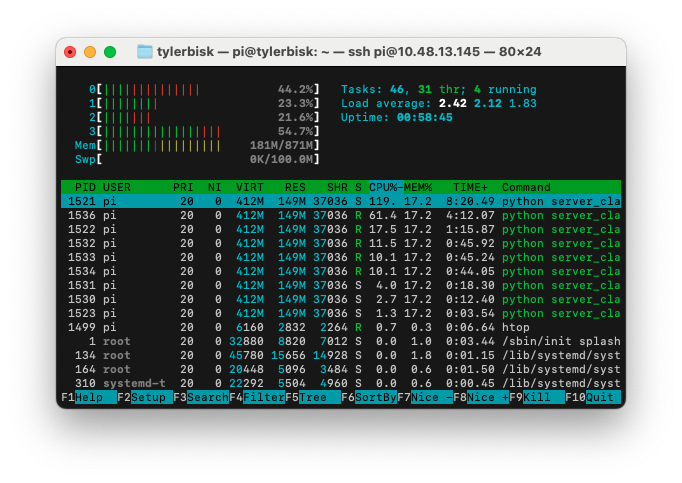
This more powerful Raspberry Pi 3 has computation and memory to spare during full code execution, as shown using htop in Figure 15.
Motion
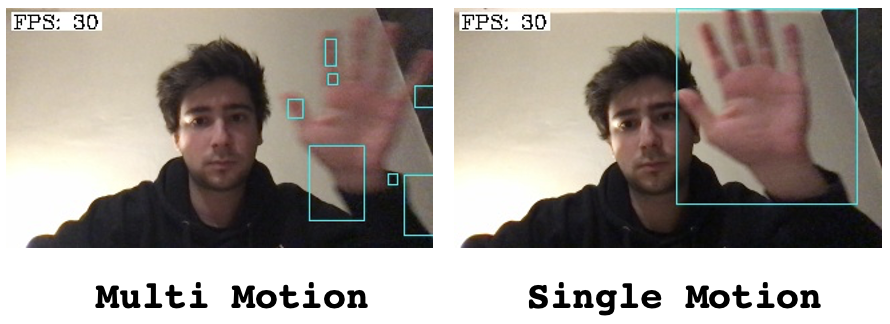
Two slightly different motion detection methods were developed according to two different interpretations of the objective. In one method, called Multi-Motion, motion is said to have occurred in each region where the current frame differs from the previous frame. In the second method, called Single Motion, motion is said to have occurred in the region that contains all regions that differ from the previous frame. The idea behind Multi-Motion is to detect multiple distinct objects entering or exiting the frame, whereas Single Motion simply is a binary indicator of whether motion occurred or did not occur. However, Multi-Motion is not advanced enough to cluster movement from the same object into one motion event as seen in the comparison in Figure 16. Motion detection is simply used to reduce the overall computation done by the system, so for this project, Single Motion is sufficient and is therefore the version of motion detection used in the final code. Both versions of motion are included in the codebase.
Conclusion
Summary
The system works end-to-end as expected. With server_classicication.py running on the Raspberry Pi, when an object suddenly enters the frame, motion is detected and the image is sent through a pre-trained neural network. If the neural network recognizes the object as a bird, the system will begin recording a video until the bird leaves the frame. The video is stored in local memory and a copy is emailed to the user with the timestamp in both the filename and the subject of the email. The frame next gets sent to the Google Lens API where the species of bird contained in the frame is returned and sent to the user. Simultaneously, the video feed is streamed to a web server that can be viewed from anywhere in the world. The video feed and recording stream at 24 FPS, with objects boxed and labeled with their names. The system is easy to use and runs perpetually without the need for any human interaction, as it is automatically launched on boot using systemd.
Performance
There is a clear inverse correlation between the accuracy of object recognition and how long it takes to identify an object. The solution that keeps these two objectives in balance is to only look for objects after motion is detected. This addition was a great compromise between accuracy and speed because the video was still smooth most of the time and objects would rarely be missed. Furthermore, the video feed was shrunk to 320p before object recognition to further decrease computation time.
Using a smaller pre-trained neural network allowed object recognition to be performed on a system with very limited RAM. Although confidence is lower for YOLO Tiny, the model does still come up with the correct label for the object, and therefore the project is still viable without upgrading to a more expensive Raspberry Pi. Given YOLO Tiny still came up with the correct label, giving up a bit of accuracy in favor of a faster and cheaper system is worth the tradeoff. The delicate balance between cost, accuracy, and speed was maintained.
Potential Improvements
Hardware seems to be the biggest limitation right now. Improvements to hardware could include a Raspberry Pi 4 which has twice as much RAM and twice as much computation power as the Raspberry Pi 3. This improvement would allow the use of the normal YOLO model on the Pi as CPUs and memory decrease in price and $35 machines become more powerful. The performance of the YOLO model functioned as expected where it would identify objects correctly most of the time even at 320p, but upgrading hardware could allow an increase in video quality to 720p. Additionally, there are newer versions of YOLO that have been released and could offer improvements over Version 3 used in this project.
The addition of a hardware motion sensor could decrease the power consumption of the system during the nominal state when nothing is in-frame. In this case, the camera could be turned off completely and both the computer vision and web server threads could yield until interrupted by the motion sensor.
References
[1] Arducam, “Raspberry Pi Camera Pinout,” 2023. Available: https://www.arducam.com/raspberry-pi-camera-pinout/
[2] Kuruki, “Raspberry Pi,” 2014. Available: https://forums.raspberrypi.com/viewtopic.php?t=156098.
[3] Redmon, Ali, Joseph and Farhadi, “YOLOv3: An Incremental Improvement,” 2018. Available: https://pjreddie.com/darknet/yolo/.
[4] Raspberry Pi, “Raspberry Pi Documentation,” 2023. Available: https://www.raspberrypi.com/documentation/.
[5] Tsai and Shiwa, “Lab Prototype Board for the Pi Pico RP2040,” 2021. Available: https://vanhunteradams.com/6930/Tsai_Shiwa.pdf.
[6] S. Luthra, “SIMULTANEOUS LOCALIZATION AND MAPPING ON A QUADCOPTER,” 2018. Available: http://people.ece.cornell.edu/land/courses/eceprojectsland/STUDENTPROJ/2017to2018/sl2462/project_68_report.pdf.
[7] Katz and Kummer, “ECE PROMOTIONAL DISPLAY TECHNOLOGY,” 2018. Available: https://people.ece.cornell.edu/land/courses/eceprojectsland/STUDENTPROJ/2017to2018/djk289_fck22/project_72_report.pdf.
[8] M. Zub, “Web scraping Google Lens Results with Nodejs,” 2023. Available: https://medium.com/@mikhail.a.zub/web-scraping-google-lens-results-with-nodejs-70a4 66bbe2d4.
Code
Code is publically available at https://github.com/tylerbisk/cv-birdfeeder.